
Una guida completa per realizzare un accesso elettronico affidabile, elegante e totalmente integrato con ESPHome.
—
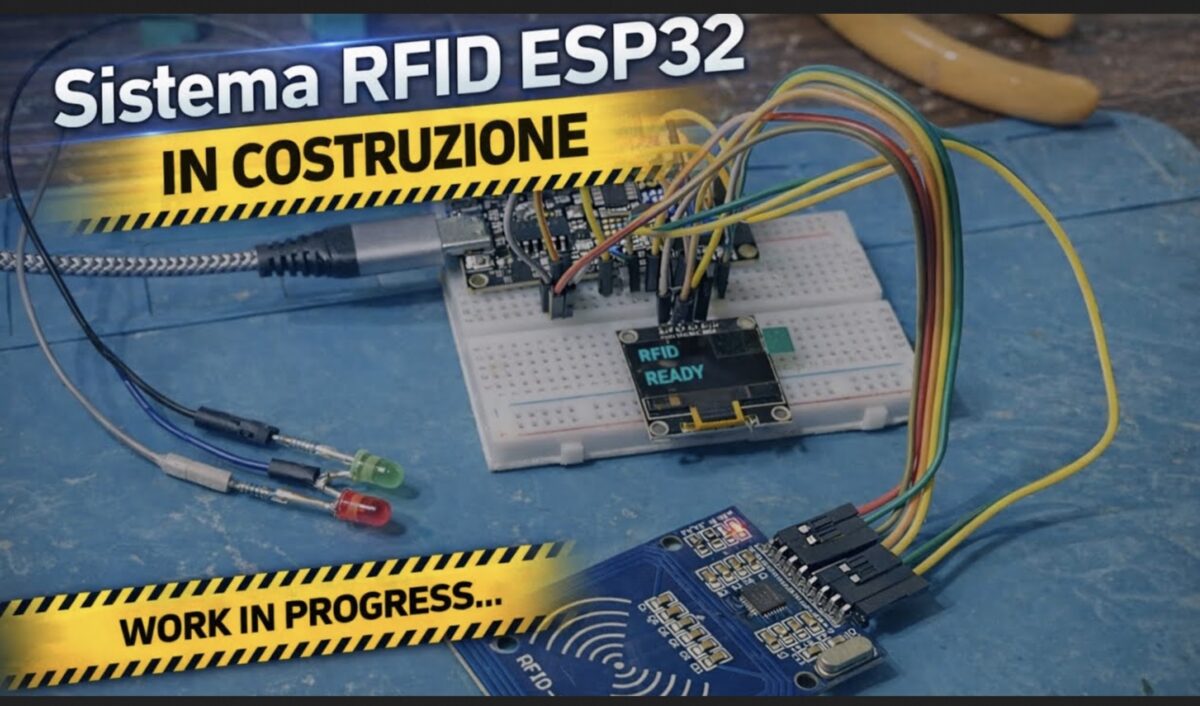
🔧 Componenti necessari
- ESP32 DevKit
- Lettore RFID RC522 (SPI)
- Display OLED SSD1306 128×64 (I2C)
- Modulo relè 5V
- LED verde + LED rosso (con resistenze 220–330 Ω)
- Buzzer attivo a 3 pin
- Alimentazione 5V
- Cavi dupont
—
🧩 Collegamenti elettrici
Tabella completa dei collegamenti ESP32 → Componenti
RC522 (SPI)
| Funzione RC522 | Pin RC522 | Pin ESP32 |
| Alimentazione | VCC | 3.3V |
| Massa | GND | GND |
| Reset | RST | GPIO22 |
| SS / SDA | SDA | GPIO5 |
| SCK | SCK | GPIO18 |
| MOSI | MOSI | GPIO23 |
| MISO | MISO | GPIO19 |
Display OLED SSD1306 (I2C)
| Funzione OLED | Pin OLED | Pin ESP32 |
| Alimentazione | VCC | 3.3V |
| Massa | GND | GND |
| SDA | SDA | GPIO21 |
| SCL | SCL | GPIO17 |
LED di stato
| LED | Anodo → ESP32 | Catodo → |
| Verde | GPIO14 (via resistenza) | GND |
| Rosso | GPIO27 (via resistenza) | GND |
Relè cancello
| Funzione | Pin modulo relè | Pin ESP32 |
| Segnale | IN | GPIO32 |
| Alimentazione | VCC | 5V |
| Massa | GND | GND |
Buzzer attivo 3 pin
| Funzione | Pin buzzer | Pin ESP32 |
| Alimentazione | VCC | 5V |
| Massa | GND | GND |
| Segnale | I/O | GPIO26 |
💡 Funzionamento del sistema
- Quando un tag RFID viene avvicinato, l’ESP32 legge l’UID tramite il modulo RC522.
- Se il tag è autorizzato:
- Il relè invia un impulso per aprire il cancello
- Il LED verde si accende per 8 secondi
- Il display mostra “ACCESSO CONSENTITO”
- Il buzzer emette due beep
- Se il tag non è autorizzato:
- Il LED rosso si accende per 8 secondi
- Il display mostra “ACCESSO NEGATO”
- Il buzzer emette tre beep rapidi
—
🧠 Codice ESPHome completo e funzionante
esphome:
  name: esphome-web-568b34
  friendly_name: Esp32 RFID
  min_version: 2025.11.0
  name_add_mac_suffix: false
  on_boot:
    priority: -100
    then:
      - switch.turn_on: rele

esp32:
  variant: esp32
  framework:
    type: esp-idf

logger:
  level: DEBUG

api:

ota:
  platform: esphome

wifi:
  ssid: "xxx"
  password: "sxxxxx"

spi:
  clk_pin: 18
  mosi_pin: 23
  miso_pin: 19

rc522_spi:
  cs_pin: 5
  reset_pin: 22
  update_interval: 1s
  on_tag:
    then:
      - lambda: |-
          std::string uid = x;

          uint32_t now = millis();
          if (now - id(ultimo_lettura) < 2000) {
            return;
          }
          id(ultimo_lettura) = now;

          ESP_LOGI("rfid", "Tag rilevato: %s", uid.c_str());

          id(ultimo_tag).publish_state(uid);

          for (auto &t : id(tag_autorizzati)) {
            if (t == uid) {
              ESP_LOGI("rfid", "Accesso consentito");

              id(accesso_consentito).publish_state(true);
              id(accesso_negato).publish_state(false);

              id(led_ok).execute();
              id(display_ok).execute();

              return;
            }
          }

          ESP_LOGW("rfid", "Accesso negato");

          id(accesso_consentito).publish_state(false);
          id(accesso_negato).publish_state(true);

          id(led_ko).execute();
          id(display_ko).execute();

globals:
  - id: tag_autorizzati
    type: std::vector<std::string>
    initial_value: '{"67-89-90-C9", "67-FA-0A-c9"}'

  - id: ultimo_lettura
    type: uint32_t
    initial_value: '0'

output:
  - platform: gpio
    pin: 14
    id: led_verde_pin

  - platform: gpio
    pin: 27
    id: led_rosso_pin

script:
  - id: led_ok
    then:
      - switch.turn_on: buzzer
      - delay: 120ms
      - switch.turn_off: buzzer
      - delay: 120ms
      - switch.turn_on: buzzer
      - delay: 120ms
      - switch.turn_off: buzzer

      - switch.turn_off: rele
      - delay: 1s
      - switch.turn_on: rele

      - light.turn_on: led_verde
      - delay: 8s
      - light.turn_off: led_verde
      - lambda: |-
          id(accesso_consentito).publish_state(false);

  - id: led_ko
    then:
      - switch.turn_on: buzzer
      - delay: 80ms
      - switch.turn_off: buzzer
      - delay: 80ms
      - switch.turn_on: buzzer
      - delay: 80ms
      - switch.turn_off: buzzer
      - delay: 80ms
      - switch.turn_on: buzzer
      - delay: 80ms
      - switch.turn_off: buzzer

      - light.turn_on: led_rosso
      - delay: 8s
      - light.turn_off: led_rosso
      - lambda: |-
          id(accesso_negato).publish_state(false);

  - id: display_ok
    then:
      - display.page.show: page_ok
      - delay: 8s
      - display.page.show: page_idle

  - id: display_ko
    then:
      - display.page.show: page_ko
      - delay: 8s
      - display.page.show: page_idle

light:
  - platform: binary
    id: led_verde
    name: "LED Verde RFID"
    output: led_verde_pin

  - platform: binary
    id: led_rosso
    name: "LED Rosso RFID"
    output: led_rosso_pin

switch:
  - platform: gpio
    id: rele
    name: "Relè Cancello"
    pin:
      number: 32
      inverted: true
    restore_mode: ALWAYS_ON

  - platform: gpio
    id: buzzer
    name: "Buzzer RFID"
    pin:
      number: 26
    restore_mode: ALWAYS_OFF

text_sensor:
  - platform: template
    id: ultimo_tag
    name: "Ultimo TAG RFID"
  - platform: wifi_info
    ip_address:
      name: "ESP32 IP Address"
    ssid:
      name: "ESP32 WiFi SSID"
  - platform: version
    name: "Firmware ESPHome"

button:
  - platform: restart
    id: riavvia_esp
    name: "Riavvia Proxy ESP32"

binary_sensor:
  - platform: template
    id: accesso_consentito
    name: "Accesso RFID Consentito"

  - platform: template
    id: accesso_negato
    name: "Accesso RFID Negato"

i2c:
  sda: 21
  scl: 17
  scan: true

font:
  - file: "gfonts://Roboto"
    id: font1
    size: 20

display:
  - platform: ssd1306_i2c
    model: "SSD1306 128x64"
    address: 0x3C
    id: oled
    pages:
      - id: page_idle
        lambda: |-
          it.printf(0, 0, id(font1), "RFID");
          it.printf(0, 28, id(font1), "READY");

      - id: page_ok
        lambda: |-
          it.printf(0, 0, id(font1), "ACCESSO");
          it.printf(0, 28, id(font1), "CONSENTITO");

      - id: page_ko
        lambda: |-
          it.printf(0, 0, id(font1), "ACCESSO");
          it.printf(0, 28, id(font1), "NEGATO");

sensor:
  - platform: uptime
    name: Uptime Sensor
    filters:
      - lambda: return x / 3600;
    unit_of_measurement: "h"
    accuracy_decimals: 2